Release 8.0.3
A53746-01
Library |
Product |
Contents |
Index |
| Oracle Networking Products Getting Started for Windows Platforms Release 8.0.3 A53746-01 |
|
![]()
![]()
This chapter describes configuration for ANO:
| Note:
All ANO features are discussed in the Oracle Advanced Networking Option Administrator's Guide. |
ANO consists of three components:
Network Security is an Oracle network data encryption and checksumming service to ensure secure transmission of data over networks. Network Security uses encryption and authentication engines from RSA Data Security, Incorporated.
These concepts are explained in the following sections:
Encryption provides a way to ensure confidentiality of information. Encryption is the transformation of data so that it is unreadable by anyone without a (secret) decryption key. Encryption provides a means to ensure confidentiality of information by keeping its content hidden from anyone for whom it is not intended, even those who can see the encrypted data. For example, one may want to encrypt sensitive information stored on a laptop so that if the laptop is stolen, the data cannot be recovered by the thief.
In symmetric-key encryption, the sender of a message uses a secret key to encrypt the message, and the receiver uses the same secret key to decrypt the message. If Alice and Bob want to communicate, they must each know what the secret key is (and the key must be exchanged in a way that the secrecy of the key is preserved). If Bob and Steve want to communicate, they must also have a separate key (so that, for example, Alice cannot read their messages).
The main drawback of symmetric-key encryption is that, in a system with many users wanting to communicate, the management and distribution of keys becomes overwhelming.
Public key cryptography solves the key management problem of symmetric-key cryptography. In the public key scheme, each person receives a pair of keys:
Each person's public key is published, while the private key is confidential. Messages encrypted with a public key can only be decrypted with the corresponding private key. Messages encrypted with a private key can only be decrypted with the corresponding public key. Keys may not be deduced from each other. The sender and receiver of an encrypted message do not share confidential information, since all communications involve only public keys. Private keys are neither transmitted nor shared.
For example, Alice sends a message to Bob so that only Bob can read it. She encrypts the message with Bob's public key, which is public knowledge. Bob decrypts the message with his private key to read it. Only Bob owns the private key that is able to decrypt the message, and only Bob can read the message.
Public key cryptography can be used for authentication (digital signatures) as well as for privacy (encryption). A digital signature is a non-forgeable way of authenticating the sender of a message and supports non-repudiation of messages. Only the purported sender of a message could actually have sent the message. The sender cannot later claim that someone impersonated her or him.
For example, Alice orders equipment, and the purchasing department (where Bob works) requires a digital signature on the purchase order. To sign the purchase order, Alice performs a computation (hash) of the message, encrypts the hash with her private key, and attaches the encrypted hash (digital signature) to the order before sending it. To verify the signature, Bob decrypts the hash with the public key belonging to Alice, performs the same computation on the order, and compares the results with the decrypted hash that Alice sent to him. If the results are the same, then only Alice could have sent the message.
To establish confidence in the identity associated with a public key, public keys are incorporated into digital certificates. A digital certificate is a binding of a public key to a user by a trusted third party known as a Certificate Authority (CA). The public key and user identity, together with other information such as the certificate expiration date, are digitally signed by the CA. CAs serve as electronic notaries, attesting to the identity of users and the validity of their public keys.
Certificates may be issued in several ways. For instance, Alice may generate her own key pair and send the public key to an appropriate CA with some proof of her identification. The CA verifies the identification and takes other steps to ensure that Alice is really Alice. Next, the CA sends Alice a certificate attesting to the binding between Alice and her public key, along with a hierarchy of certificates verifying the CA's public key. Alice can present this certificate chain whenever necessary to demonstrate the legitimacy of her public key.
Alternatively, the key pair may be generated by an administrator in a way that the person generating the keys does not know the private key of Alice. The private key may be given to her on a diskette or embedded within a token. The public key belonging to Alice is bound to a certificate by the CA, a copy given to Alice and a copy stored in a public database for ready access.
Public keys are sometimes revoked before their expiration date. Such instances include compromised keys or employment termination. A Certificate Revocation List (CRL) lists such revoked public keys. CAs maintain CRLs and provide information about revoked keys originally certified by the CA. CRLs list only current keys, since expired keys are not valid. A revoked key past the expiration date is removed from the list. Although CRLs are maintained in a distributed manner, networked sites may provide a centralized location for the latest CRLs.
See the RSA Data Security website at http://www.rsa.com for more information about public key cryptography and digital signatures.
Note:
These algorithms are supported:
The single sign-on feature allows users to access multiple accounts and applications with a single password. This feature eliminates the need for multiple passwords for users and simplifies management of user accounts and passwords for system administrators.
Centralized, secure authentication services increase your confidence in the identity of users, clients, and servers in distributed environments. Network authentication services also can provide the benefit of single sign-on for users.
ANO supports these authentication adapters:
Distributed Computing Environment (DCE) Integration enables users to transparently use Oracle tools and applications to access Oracle7 servers in a DCE environment. The Oracle DCE Integration product consists of two major components:
The DCE Communication/Security Adapter provides:
RPC is the transport mechanism that enables multi-vendor interoperability for DCE Integration. RPC also uses additional DCE services, including directory and security services, to provide location transparency and secure distributed computing.
DCE Integration works with the DCE Security Service to provide security within DCE cells. It enables a user logged onto DCE to securely access any Oracle application without specifying a username or password. This function is referred to as external authentication to the database. In addition, clients and servers not running DCE authentication services can interoperate with systems that have DCE security by specifying an Oracle password.
DCE Integration uses multiple levels of security to ensure data authenticity, privacy, and integrity. For example, users have a range of choices, from no protection to full encryption for each connection, with a guarantee that no data has been modified in transit. For parts of your network that do not use DCE, you may want to use ANO-Network Security and Single Sign-On.
DCE Integration registers Oracle7 connect descriptors in the DCE CDS Naming Adapter, allowing them to be transparently accessed across the entire DCE environment. Users can connect to Oracle database servers in a DCE environment using familiar Oracle service names.
The DCE CDS Naming Adapter offers a distributed, replicated repository service for name, address, and attributes of objects across the network. Because servers register their name and address information in the DCE CDS Naming Adapter, Oracle clients can make location-independent connections to Oracle servers. Services can be relocated without any changes to the client configuration. An Oracle utility is provided to load the Oracle service names (with corresponding connect descriptors) into the DCE CDS Naming Adapter. After the names are loaded, Oracle connect descriptors can be viewed from a central location with standard DCE tools.
Net8 and ANO have some DLLs that share the same name but not the same functionality. Therefore, do not install Net8 after installing ANO. If you do, ANO will not work because some DLLs will be overwritten.
This section describes specific platform-specific configuration steps to perform for Network Security and Single Sign-On.
| Additional Information:
General configuration instructions are described in detail in the Oracle Advanced Networking Option Administrator's Guide. |
To use the Kerberos Authentication Adapter, you need to have the root drive :\USR\TMP subdirectory present.
| Note:
You may experience difficulty executing SQL scripts from SQL*Plus if you use the Kerberos Authentication Adapter. Re-installing SQL*Plus for Windows NT and Windows 95 solves this problem. |
To use the SecurID Authentication Adapter, you need the following from your SecurID administrator:
Before using the CyberSAFE Authentication Adapter:
| Additional Information:
See the CyberSAFE Application Security Toolkit documentation. |
This section describes the following:
See Oracle Advanced Networking Option Administrator's Guide.
If during the installation of Oracle Enterprise Manager Biometrics Manager, you chose not to allow the installer to set up your Identix TouchSafe II Device Driver, then you can configure it manually as follows.
| Note:
You need to know the IO Port that your Identix TouchSafe II is using before doing this. Please refer to the Identix TouchSafe II Hardware documentation. |
To install the TouchSAFE II Encrypt device driver for Intel Windows NT:
IoPortAddress = REG_DWORD 0x00000360 for I/O port 0x360
For example:
copy etsiint.sys c:\winnt35\system32\drivers
-> copy etsiint.sys c:\winnt351\system32\drivers
Oracle Corporation does not support any native authentication when connecting from an Oracle Server on Windows NT to a UNIX authentication server. On the NT machine where the Oracle Server is located, modify the TNSNAMES.ORA file to include the following:
. . .
    (CONNECT_DATA =
      (SID = <SID>))
                     (SECURITY=(AUTHENTICATION_SERVICES=NONE))
. . .
| Note:
If you want a secure connection, you can still use Kerberos, CyberSAFE, or SecurID. If you use one of these adapters, do not add this line. |
When using Digital DCE, do not start the listener with the LSNRCTL80 utility. Instead, use the Windows NT Services Control Panel to start the listener.
| Note:
The NDS Native Naming Adapter is shipped as a part of Net8. To use the NDS Authentication Adapter, you must run NetWare 4.1 or above with NDS. |
The NDS Native Naming Adapter for Windows NT clients uses the NDS naming environment to store service names and addresses of Oracle databases. This lets an NDS user view the entire network under a single NDS directory tree. You can use native name services in addition to or instead of Oracle Names or the TNSNAMES.ORA file.
If the NDS Authentication Adapter is also used, a single login can access a multi-server and multi-database network.
| Additional Information:
See:
|
To connect with the NDS Native Naming Adapter:
| Additional Information:
See:
|
CONNECT username/password@database_object_name
where database_object_name identifies the Oracle7 Server in NDS.
From the taskbar, select Start > Programs > Oracle for Windows NT or Windows 95 > Oracle Net8 Assistant.
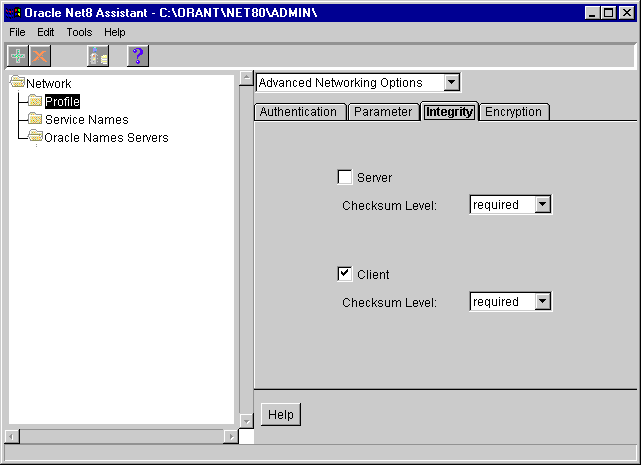
The profile details appear on the right side of the screen.
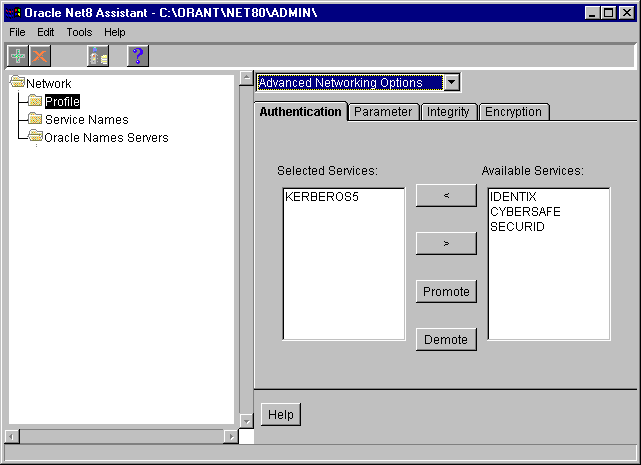
The default values appear in the fields. Modify the values as necessary.

The available algorithms appear in the list box on the right side of the window.
The server and client negotiate to determine which algorithm was used to encrypt your data.
| Field | Description |
|---|---|
|
Server |
Select Requested, Rejected, Required |
|
Client |
Select Requested, Rejected, Required |